SCALE SCALE provides the challenge of using one's craftsmanship to construct a nice looking scale model of a real rocket, and to build it be as accurate as possible. The competition goes beyond looks, as the models are measured for dimensional accuracy. Further, the entries are also judged on their flight characteristics and lack of post-flight damage. The Scale model must be based on an existing or historical guided missile, rocket vehicle, or space vehicle. If the real rocket was staged, the model has to have all the stages. For example, the WAC Corporal was 2-staged, so an entry that models just the upper stage by itself is not legal for the event. Same goes for the Navy's sea-launched versions of the "Tomahawk" cruise missile. Models of those need to include the rocket boosters that got them airborne. A model of a multi-stage rocket does not need to actually stage. For instance, a WAC Corporal with a single engine in the (first stage) booster is fine. Scale entries cannot exceed 1500 grams (approximately 3.3 pounds) mass at liftoff. Each entry must make at least one safe and stable flight (two flights are allowed), otherwise the model is disqualified and the static score is useless. The model can be clustered or staged (stages need to recover in a safe manner: a Saturn-V first stage tumbling to the ground "like the real thing" would be disqualified). Clustering or staging is not recommended for inexperienced fliers. Entering for judging: Turn-in for static judging will be Sunday night. The model needs to be entered in the same condition it will be for flight. No parts may be added or removed between judging and flying, other than internal parts such as the recovery system. Your NAR number should be on the model. Many contestants use decals or dry transfer numbers for this. A display stand of some type is useful, but not required. The stand is not judged but is nice to keep the model from falling over , and it helps present the model at a desired viewing angle. Scoring - For Scale, the model is judged in advance to arrive at a static score. The static score is based on Craftsmanship, Difficulty, and dimensional accuracy. When flown, it is also judged for General flight points (including lack of flight damage), and "Mission" points. The model is allowed to make two flights, the best single qualified flight score is used. The final score is a total of the static score and the best flight score. Engines - You can use any NAR Contest Certified engine that is suitable, considering the weight and drag of your model and the time delay to ejection. However, the maximum engine total impulse allowed is 160 Newton-Seconds (Full G power). The sum of the total impulses of the engines in clusters and multiple stages cannot exceed 160 N-sec. For the full rules for this event, please see the Scale Rules on the NAR web page. Model choice is important. - What makes a good choice for you to build for Scale is just that, what will be good for YOU. If you are not good at masking off corrugations to create black and white roll patterns, then a Saturn is probably not a good choice for you to make. It is nice to choose a model that inspires you to learn new skills. But not if it is going to involve learning a number of different skills that you won't have time to master well enough to complete a good model. Should you choose a model that will involve new skills and techniques, it is best if you learn those skills early. Allow extra time to learn and test them out before building the real model. Choose something that you feel you can do a good job on. Also, it tends to help if you actually like the vehicle you are building a scale model of. Try to plan out the time the model will take to complete. Usually, one can come up with a time estimate and then multiply it by 1.5 or 2 times, as things inevitably take longer to complete. This can be especially true when you're learning new methods or trying new things for the first time. It is not good to have a nice model that is a couple of nights shy of being completed in time, or a model rushed to completion so that it suffers in appearance. Order any special parts or supplies EARLY. A list of kits, and list of data sources is included further down on this page. Note that some manufacturers make some kit models that look scale-like but are not based on a real rocket. If you are looking for a kit, make sure it is of a real rocket, missile, or launch vehicle. Some manufacturers have made kits of "bombs", but those are not rockets or missiles, and are not be legal for Scale. Neither is an SR-71 (it's a jet), while an X-1 or X-15 would be OK as those were rocket powered. Scale Data - Something to also consider is whether you can collect enough data to document your model. Scale is much harder to obtain data for than Sport scale, due to the requirement for data for some key dimensions. Minimum allowable data consists of (you must have these):
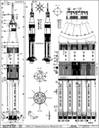
You might wish to read the Scale Rules for the fully detailed description of the data. Also, you may want to look at the Scale Judging Guide, which shows how the judges will score the model. Take note that the Scale Data pack itself is judged, for up to 50 points. If you are building a kit, make sure that you find the right data to go with it. If the kit does not look similar to the data/photos of the real thing, then warning bells should go off. It may be the kit is wrong, or that the kit is OK but is of a mission or version that is different from what the data represents. Or, the kit may be "semi-scale", not as accurate as one might desire. Rockets on static display (such as at museums) are too often poor sources of documentation. Many are not painted correctly, and some were not even assembled right. It's best to go with data and photos based on the real thing that flew, if at all possible. If you are building from a kit, there are usually drawings and photos that you can obtain if you look hard enough. A list scale data sources is included further down on this page. Model Dimensions Drawing The scale data drawing is necessary in two ways. At the least, you need to convert full size dimensions to model-size dimensions in order to actually build the model. You might scribble together your own crude sketch or use a photocopy of a drawing of the rocket to work up the dimensions so you'll know what to work with, for building the model. But later for the scale data pack, you'll want to have something that is better than a crude scribbling. For a simple type rocket, it is not too hard to draw up your own. It does not have to be detailed, just needs to show the dimensions. For some more complex rockets, you will probably want to use a photocopy or a scan of a good drawing. A scan is nice since you can use your computer to add in the dimensional text and perhaps lines with arrows to show lengths (in the case of drawings that give station number and not dimensions, you will need to modify the drawings to convert station numbers to dimensions). You can also simply present the dimensions in a table format. In any case, you have to present the full size dimensions and the model dimensions. Make it clear in the data pack or the drawing as to which are the model dimensions. Three examples of drawings with model dimensions are shown below. The Black Brant V Drawing is typical of a simple homemade drawing. The Little Joe-II and Saturn-IB Drawings are at the other end of the spectrum.
The Model Dimensions drawing is not necessarily the only drawing you may want to include in your data pack. For one, if you drew up your own drawing for model dimensions, you definitely need to include the original data source you used for making up your own drawing. If you modified an existing drawing from another source, you might want to include a "clean" original. Also, you may want to include some other drawings that show other details or information that will be useful to the judges, but which do not require you to include dimensions for. For example the Little Joe-II drawing above has a lot of dimensional data for the judges to measure from, but there is much detail that is not shown which was shown in greater detail among other drawings in the May/June and July/August 1991 issues of American Spacemodeling Magazine (now Sport Rocketry). So when I have flown the Little Joe-II, I have included the other pages of drawings to supplement the model dimensions drawing. The Saturn-IB Drawing was made in the early 1990's for Jay Marsh to use for his FAI scale model for the US Team. It was later used by others such as Tom Campbell and David Bellhorn. They used the NARTS Saturn Data pack to supplement and support this drawing (however there are some mostly minor discrepancies between the NARTS Saturn drawings, and the IB's as actually flown) Building from scratch If you do not build a kit, here are some tips to keep in mind. What size? - First, determine what scale to build the model. You may have in mind what general size you want to build, regarding length or diameter, so choose a ballpark size and then see what scale ratio would give you a model of that size. Also consider the weight and engine power (more later). There is a very handy Body Tube diameter & ratio chart on the WOOSH section's website (PDF version, Excel version). It lists a lot of tube diameters which are available from many different vendors. Looking at the scale data, divide the real rocket's diameter by the diameter of the body tube you have in mind. For example, a 16.5" diameter for the real rocket, and 1.637" for a BT-60. The resulting scale would be 1 to 10.079 (or 1/10.079). Well, after primer and paint, that BT-60 will be larger than 1.637", and this is Scale, so the scale for such a model might as well be rounded to 1/10. Some more experienced scale builders will prime a tube and even paint a scrap piece to find out almost exactly what the final diameter would be, and only then select a scale factor. There is no penalty for not rounding and choosing say 1/10.13 scale or 1/9.98 scale. If the rocket has more than one body tube diameter, you may have to reconsider the scale until you find two (or more) tube diameters that match up closely enough to look right. You could also consider making a custom tube, or to resize an existing tube to a smaller diameter. See the tip from John Pursley on reducing a tube's diameter. So, having determined what scale the model will be, divide all of the dimensions of the real thing by the scale factor (in this case 10). It helps to use a photocopy of the original data so you can write in the model dimensions for workshop use. Now, some data sources do not list dimensions directly, but as "Station Numbers" (often with a "STA" prefix). So you have to work out the particular dimensions between any two given station numbers. It's not hard, just different. Here is a drawing for a Saturn-IB, at 1/66 scale, which is a good example of station numbers and the dimensions that were derived from those numbers. This particular drawing shows both the original full size dimensions, as well as the 1/66 scale dimensions (Full size dimensions were derived first, from the STA numbers. Then the 1/66 dimensions were derived from the full size dimensions). Since this is Scale, the model will be measured. You need to work out the dimensions, and keep track of them for your workshop references, so you can build it accurately. Go over the numbers again, as a "sanity check", to make sure you didn't make some calculation error that may not be obvious until it is too late. Nose cones & adapters - Are there any commercial nose cones that will work for the model you are planning? Some companies might offer the right shape, but only for certain diameters of tubes. So if you want to use those noses, you'll have to base the scale of the model on the tube diameter that fits that nose. Same thing for adapters/reducers. For totally custom parts, you can turn your own nose cones or adapters using a simple lathe or even an electric drill. But that is not as necessary to do these days, thanks to the emergence of Balsa Machining Service (BMS). They make custom nose cones, adapters, and nose blocks to order. Check out the order form on their site as to the different shapes they make. They also do custom laser-cutting work. If you would like to have lightweight hollow plastic parts , you could consider vacuum-forming. Here is an article on how to make your own simple vac-former. Here are tips from Peter Alway, on how to calculate an adapter shroud (for thin cardboard or thin plastic), and for cutting body tubes (A fresh single sided razor blade is preferred by some, instead of a model knife). There is also Robert Blaske's online Shroud Calculator on EMRR (uses Javascript). Steve Humphrey created a PowerPoint-based shroud/transition maker.. It will calculate and generate patterns, including for offset and complex shapes such as the Nike-Hercules and X-17. Mass and thrust: The model won't go very high if it's too heavy for the engine it's flying on. Some scale models can be heavy for their relative size, and some require additional noseweight. Estimate the weight of the completed model, ready to fly, and determine what kind of engine necessary for the job based on other models of similar weight and drag. The thrustline should be through the center of gravity of the model, or very close to it. If not, the model will pitch over under thrust. Fortunately for "normal" rockets this is simple, the cylindrical body of a Saturn-V-type model means the center of gravity will be in the center of the body. But something like a space shuttle, with the orbiter offset on one side, calls for a very special thrustline layout. Clustered models have a bigger problem. All the engines must ignite at the same time or the model may pitch badly at liftoff, which may cause it to crash. The same can be said for the risks of staging scale models. So, clustering or staging is not recommended, unless you have lots of good experience, ideally including boilerplate testing. Stability: Some scale models need help to be stable. The easy way is to add noseweight (such as clay, or small lead fishing weights embedded in clay), which is fine for some models. For other models, the engine may not be able to lift any additional weight, or there may not be room to add noseweight. The fins may be too small, or non-existent, so the fin area must be increased. However, noticeably increasing the size of the scale fins will give the judges reason to take off points from the outline score. So, if a model really needs to have more fin area, clear plastic fins may be the way to go. Some kits like the old Estes Space Shuttle stack, and Titan-IV, used plug-in opaque fins painted black (plugging into the bottom of the SRB's). Judges almost always take off significant points for models whose fins are done that way. Clear fins are notoriously difficult to glue on neatly and mask off for painting, so this is not a good route for the less experienced. If you choose to use clear fins, you can get the 0.04" clear plastic made by Plastruct. That clear plastic is a bit flexible, this is not a problem for small fins but can be for large fins. If flexing is a problem, try to find cheap clear plastic boxes to cannibalize for stiff clear fin material. However, one of the most ideal clear fin materials is Lexan (aka Polycarbonate). You can find 1/32" and 1/16" thicknesses of it sold by Micro-Mark. Do not use Cyanoacrylate to attach clear fins. It does not work well, and it often frosts up the plastic. It is not easy to glue clear fins to rocket body tubes. Even epoxy does not really bond well to plastic. If you have the skill to do it neatly, and if the model is suitable, you can use the slot and tab method with the clear fins. Perform the following steps before you glue in the engine mount. You may need to plan a careful assembly sequence in order to do this. Cut the fins with a tab in the root meant to fit into a slot in scale model's body tube. Use great care in cutting out slots that are exactly the width of the fin thickness, or perhaps a hair undersize, then file slightly wider as needed. Drill a few holes into the tab portion of the clear fin, so you can epoxy the fin into the tube, with the epoxy on the inside of the tube. The holes in the tabs will allow the epoxy to grab into the holes like rivets (this is a method best tested out first with scrap plastic and tubing). Mask off the fins very carefully so that paint won't creep onto the clear fin. Boilerplate testing - If you are going to make your own scale model from scratch, not a kit, this can be very important. The more difficult or complicated the model will be, the more you ought to consider testing a boilerplate model. Given the above considerations, you've chosen a model and are ready to put your ideas and plans into action by building. But will the model really work? Would you like to know for sure your scale model will work before building a detailed pretty model? It's highly recommended to build a "boilerplate" model first and find out. This means you make a simple model that is basically like your final scale model, but it can be built more simply and quickly. Don't paint it or worry about details, or any time-consuming things that are not relevant to testing out the flying qualities. Then fly it, and see if it works. If it crashes, you saved a lot of time and effort, and might be able to determine how to solve the problem if you want to try again. If it works, great, you now have the confidence to invest that time and effort. Here's an example of a boilerplate test flight for a large clustered Little Joe-II. More general tips for all models, kit or scratch built Time management and planning - This was mentioned before, but bears repeating. However long you think it will take to make a scale model, it will take longer. So try to allow for more time to build it, if at all possible. Anything new....test out the techniques in advance if you can, so you can avoid messing up the real model. If some method just won't work at all you can plan for an alternative without being stuck in the middle of building the model. Kit upgrades: A half measure between building from scratch, and doing a kit, is to get a kit that may not have much detailing to it or parts that are not quite accurate, and add your own extra detailing or improved parts. Same for upgrading the markings, including replacing stick-on decals with water-slide type decals. As well, a kit based on one round or mission might serve as the foundation for significant modification to a different one. Such as a Bumper-Wac (V-2 with Wac-Corporal upper stage) or a Skylab Saturn-V. Custom Decals - Tango Papa Decals offers a variety of decals for certain scale models, at almost any desired scale. They can also do custom decal work, and sell blank decal paper. Highly recommended. Some people make custom decals, printing them on inkjet printers or color copiers. Micro Mark sells blank decal paper meant for inkjet printers, and another type of blank paper meant for color copiers or laser printers (they have both clear sheets, and white sheets). Be sure to buy a can of clear "fixative" to overcoat the decals, especially the inkjet type since without the clear coat, water will make the inkjet ink run. See Micro Mark's instructions for decal paper. Finishing: Craftsmanship counts for 300 out of 800 total points in static scoring. That's a lot. There's an all too true story about spending weeks (or longer) building a great model, and messing it up in ten seconds during painting. Try to fill the body tube spiral seams, as visible spiral seams will cost points. One way to do this is to use masking tape to mask off the whole tube EXCEPT for the seam (if the seam has a 1/16" gap, then there should be a 1/16" gap between the making tape on each side of the seam). Then use a good primer to spray a coat that will go only into that seam. Some builders like Plasti-Kote Sandable Primer--available at auto stores--as it is easy to sand. Others have success using Krylon's white sandable primer, which is more easily obtained but can have problems with clogging up the sandpaper too quickly. After letting the primer dry fully, apply more coats (letting dry fully between coats) until the buildup of the primer will be taller than the seam recess depth was. Then remove the masking tape and apply a couple of coats of white primer to the whole tube. The primer paint filling the seam should be visible as standing above the rest of the white primer on the tube. Use sandpaper to knock down the primer covering the seam and make it flush with the primer on the rest of the tube. Don't overdo it. When the seam is pretty much flush, give the whole tube another coat or two of white primer and sand the whole tube until it's uniform, no hint of the seam left. If the fins, nose, or other parts are wood, try your best to fill all of the wood grain. Try to make you model's fin shapes like the real rocket's fins. Make sure that sharp leading edges are sharp, blunt edges are blunt, straight edges are straight, and so forth. Some people do not use even wood fins, they build them up out of thin plastic or other suitable materials that will give the best end result. Always test out any new paints, and new methods you plan to do, first. So if some paints do not react well, you can learn that without messing up the model. This is also true for decals, especially decals and clear coats. Some clear coats can actually attack decals, others do not hurt the decals, but make the clear film very visible rather than disappearing. Paints for plastic models are usually good for scale rocket models. Spray cans are typically used. An airbrush is nice but overkill for many basic model's needs. If you want a flat finish but will be using decals, use gloss paint(s) first, apply the decals, then apply a flat clear coat. Otherwise, decals applied over flat paint look "silvery" in the clear areas of the decal. Anytime different paint types are used, do a test first on some scrap plastic or other material. Some paints are not compatible with other paints. Carefully applied scotch "magic" tape can work well for some simple masking jobs. After applying the second color, remove the tape mask about 30 minutes later, before the new paint gets "hard", so the tape will come off without bringing chipped flakes of the dried second coat of paint. Decal application - Setting solutions make application and final positioning of the decals easier. Tango Papa decals are easier to apply when using a setting solution. Use a setting solution to help you slide the decals into place. Setting solutions provide a "wet" film surface on the model that the decal can slide on, so you can manipulate the decal into the right spot using a small clean model brush. Do not confuse setting solution with decal softening solutions. Softening solutions make the decal film pliable so it can go over complicated surfaces (like recessed panel lines or even corrugations), but for most model work the accidental use of a softening solution can risk damaging the decals (unless you know what you are doing). Test out the use of a setting solution with scrap decals to get the hang of doing it. Acetic acid--white vinegar--is a good (and cheap) setting solution. Recovery system:
Entering & Flying Entering for judging: Turn-in at NARAMs is usually Sunday night. If you can not make it in time, someone else can turn it in for you. Contestants have sometimes even shipped models by UPS or FedEx, carefully packed.
Flight Points - When the model is flown, it will be judged in two ways. To quote from the rules:
The General Flight points are pretty basic. You want the model to fly well, hopefully straight up without spinning or wobbling, with good deployment of the recovery system and a soft landing. Pretty much like you want with any model rocket you fly, just this time it's actually judged for how it's flying. Mission points are where people get inventive. Some do clusters, some do stages. Of course, clustering or staging can be quite risky things to do. Altimeters and other devices have been flown to simulate a payload like the real thing flew. But it has to be based on things the real rocket did. If the real thing did not use a cluster of engines, then you won't get any mission points if you cluster your model. If your model flies well, and you do not think it would get a better score if it flew again, then you do not need to fly again. If it didn't fly well, or got disqualified, but was in the running for a top score, try again. If it crashed and was in the running for a top score, try a "Humpty Dumpty" repair (rebuild?) session to see if you can make it flyable again. Good luck!
John Pursley's Rocketry & Spacemodel site has a number of good tips. Unfortunately, a few were removed, so the following links are from the Internet Archive:
The last three from John Pursley refer to Sport Scale but also can be of some value for Scale.
Scale Kit Sources Note that some manufacturers make kit models that look scale-like but are not based on a real rocket (sometimes called "Pseudo-scale", or "scale-like"). So, if you are looking for a kit, make sure it is of a real rocket, missile, or launch vehicle. Some manufacturers have made kits of "bombs", but those are not missiles, so would not be legal for Scale. Also note that kits can vary widely as to how accurate they are. If a company describes its kit as "semi-scale", then it likely is a scale model of a real rocket, but it probably compromises scale qualities and accuracy significantly.
Last Updated 5/25/2008 |
|||||||||||||||||||||||||||||||||||||||||||||||||||||||||||||||||||||||||||||||||||||||||||||||

